Realistic Crack
June 15, 2009 at 1:37 am | Posted in GrApHiX, PhOtOsHoP | Leave a commentTags: PhOtOsHoP, Photoshop Tutorial, Realistic Crack
This Photoshop tutorial shows how to create a crack in a stone texture. You will learn how to create a crack with variable thickness and you’ll create shadows and highlight without using a layer style. We will also explain how a layer set/group can be used to our advantage.
1. Adding the crack (highlight) |
In this Photoshop tutorial we’re going to use the following image:

You can save this image in Windows on your hard drive by right clicking on it and selecting Save Picture As…
(I don’t own a Mac, so I don’t know what the procedure is on a Mac).
Select the Pencil tool ![]() in the tool bar and choose a master diameter of 1 px by opening the Brush Preset picker window in the option bar:
in the tool bar and choose a master diameter of 1 px by opening the Brush Preset picker window in the option bar:
![]()
Create a new layer by clicking on the Create a new layer icon ![]() at the bottom of your layers palette and rename it to White crack by double clicking on its name in the layers palette.
at the bottom of your layers palette and rename it to White crack by double clicking on its name in the layers palette.
Press the letter D on your keyboard to make the fore- and background color black and white.
Press the letter X on your keyboard to switch the fore- and background color; the foreground color is now white:
![]()
We’re now going to draw the crack.
While holding down the left mouse key start in the top/left corner and draw a crack over a distance that’s about 1/5 of the final size of the crack. Once you’ve reached that point, release the mouse button but don’t(!) move the mouse, press the right bracket key ] on your keyboard once, to increase the master diameter of the pencil with 1 pixel and continue where you left off. Stop at 2/5 of the total length of the crack, release the mouse key again, press the right bracket key ] to increase the diameter another 1 pixel and continue drawing the crack.
At 3/5 of the distance you continue by using the bracket key [ instead to decrease the diameter to 2 pixels and you repeat this again at 4/5 so that you draw the last part of the crack with a diameter of 1 pixel.
The result could be something like this:

Make sure that you draw a random line with some sharp corners, a few bends and some straight parts.
At this point the beginning and ending of the crack stops too abrupt. We’re going to fix that by using a mask.
Add a mask to this layer by clicking on the Add layer mask icon![]() at the bottom of the layers palette.
at the bottom of the layers palette.
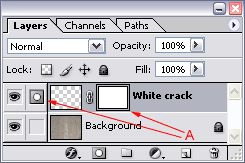
At that moment the mask is the active area (notice the double border and the mask icon ![]() in front of the layer (A)), so any further edits will take place on this mask only:
in front of the layer (A)), so any further edits will take place on this mask only:

Grab the brush tool ![]() in the tool bar and select a soft brush with a diameter of 40 in the option bar:
in the tool bar and select a soft brush with a diameter of 40 in the option bar:
![]()
Set the opacity of this brush in the option bar to 25%:
![]()
Make sure that your foreground color is black: ![]()
Now paint with black over the edges of the crack to make them fade (more transparent).
Use the following before & after rollover image as a guideline:

Continue by changing the blending mode to overlay in the layers palette and select an opacity of 75%
2. Adding the crack (shadow)

Press Ctrl + i (Command + i on the Mac) to invert the crack; it will now be black.
Important: the crack won’t look black when you look at it in your document window, since the layer’s blending mode is still set to overlay and the opacity is still 75%, since both were copied when we duplicated the White crack layer.
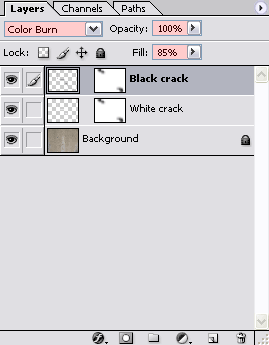
Change the blending mode of the Black crack layer in the layers palette to Color Burn, set the Opacity back to 100% and select a Fill of 85%:

With this layer selected, grab the Move tool ![]() in your tool bar and press the cursor right key
in your tool bar and press the cursor right key ![]() on your keyboard only once, then press the cursor up key
on your keyboard only once, then press the cursor up key ![]() also only once.
also only once.
At this point you should have something like this:

Notice that by using this method we’re blending the shadow with the actual texture of the wall, which results in fine visible details inside the crack which makes it all look slightly more realistic.
We’re now going to do a little trick to get rid of both identical layer masks, to end up with only one.
First click on the Create a new set icon![]() to create a new layer set (in Photoshop CS2 called a layer group).
to create a new layer set (in Photoshop CS2 called a layer group).
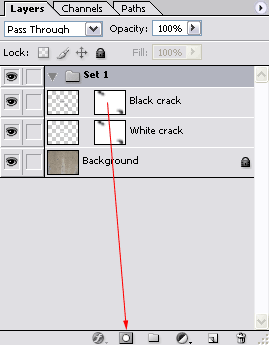
Now click on the mask that’s attached to the Black crack layer, hold down the left mouse key, move your mouse cursor until it’s on top of the Add layer mask icon![]() and release your mouse button:
and release your mouse button:

This will copy the layer mask that was attached to the Black crack layer to the layer set, since the layer set was the active layer at that time.
![]() In Photoshop CS2 we can duplicate a mask by holding down the Alt key (Option key on the Mac), click on the mask and drag and drop it onto the target layer:
In Photoshop CS2 we can duplicate a mask by holding down the Alt key (Option key on the Mac), click on the mask and drag and drop it onto the target layer:
Next we’re going to remove the masks of the Black crack and White crack layer by dragging (A) each mask to the Delete layer icon ![]() at the bottom of the layers palette. When asked “Apply mask to layer before removing?” simply click on the discard button:
at the bottom of the layers palette. When asked “Apply mask to layer before removing?” simply click on the discard button:


After removing the masks, continue by dragging the Black crack layer (B) to the layer set.
Do the same for the White crack layer (C).
Note: don’t drag the White crack layer first and after that the Black crack layer because then you end with the White crack layer as the first layer in our set, which is of course not what we want.
Continue by double clicking on the Set’s name and rename it to Crack:

I’m showing you all this to understand some of the advantages of layer sets/groups. At this point we can easily drag the crack around without having to worry about linking them. We can also easily drag the crack to a different document if we prefer to do so, because it’s now just a matter of dragging the set/group instead of the individual layers. We can now also easily hide the crack by simply clicking on the eye ![]() icon in front of the layer. Of course if we have multiple cracks it’s going to be a lot easier to keep the layers palette less cluttered when they’re all in one set/group.
icon in front of the layer. Of course if we have multiple cracks it’s going to be a lot easier to keep the layers palette less cluttered when they’re all in one set/group.
The other advantage, especially for this tutorial, is that we now have a single mask, which allows us to make a single change that will affect both the black and the white crack, which is important if we want to make the beginning or ending part of the crack fade away.
So go ahead, if you want to make some final adjustments to the mask, do that right now.
In the end we should have something like this:

Create a free website or blog at WordPress.com.
Entries and comments feeds.